
Hey everyone! Today post is going to be a triple whammy covering my latest sew(s), the B6296, aka, “The Classic pair of Pajamas That Everyone Needs at Least One of in Their Wardrobe.”
About a month ago, I sewed one set, and they were such a joy to make that I made two more sets while the sewing high was still in effect and the process was still fresh in my mind.

PJs have always been in my repertoire since I first started my sewing journey, but I only just now managed to make a pair. Being the little introverted homebody that I am, how could I not have pajamas on my list of sewing accomplishments yet?? It’s way over due.
Knowing me, I wouldn’t just want to sew any ordinary pajama pattern either. I wanted something with character, a little bit of vintage flair (naturally); Something pretty, but not fussy or frilly. Most of all, I was on the look out for something comfortable, obviously. I perused and picked out several promising patterns, but in the end, the Lisette Butterick 6296 was the winner!

I don’t think you can get more classic or timeless than this pattern, really. From the button-down top, chest pocket, and piping trim, this style is simple, yet stylish, and, not to mention, universally appealing for both men and women! Perfect for me, in case my sons or husband ever want some matching PJs.

Fabric & Prints
So with pattern done, the fun part, of course, was picking out fabric. For all three sets I used straight up woven cotton. I already had some in my stash with the cutest heart print on it. I was recently sent a Spoonflower coupon in the mail, which made me super happy because Spoonflower is a no-brainer choice for picking out cool, fun prints for pajamas. I also previously purchased more yardage from the ABM Flower Market line. If you remember my B5605 Dress Post, I used the the most adorable 70’s floral print. It’s organic cotton and feels wonderfully soft, so I figured it would work well for PJs too.
Here are my fabrics in visual detail:
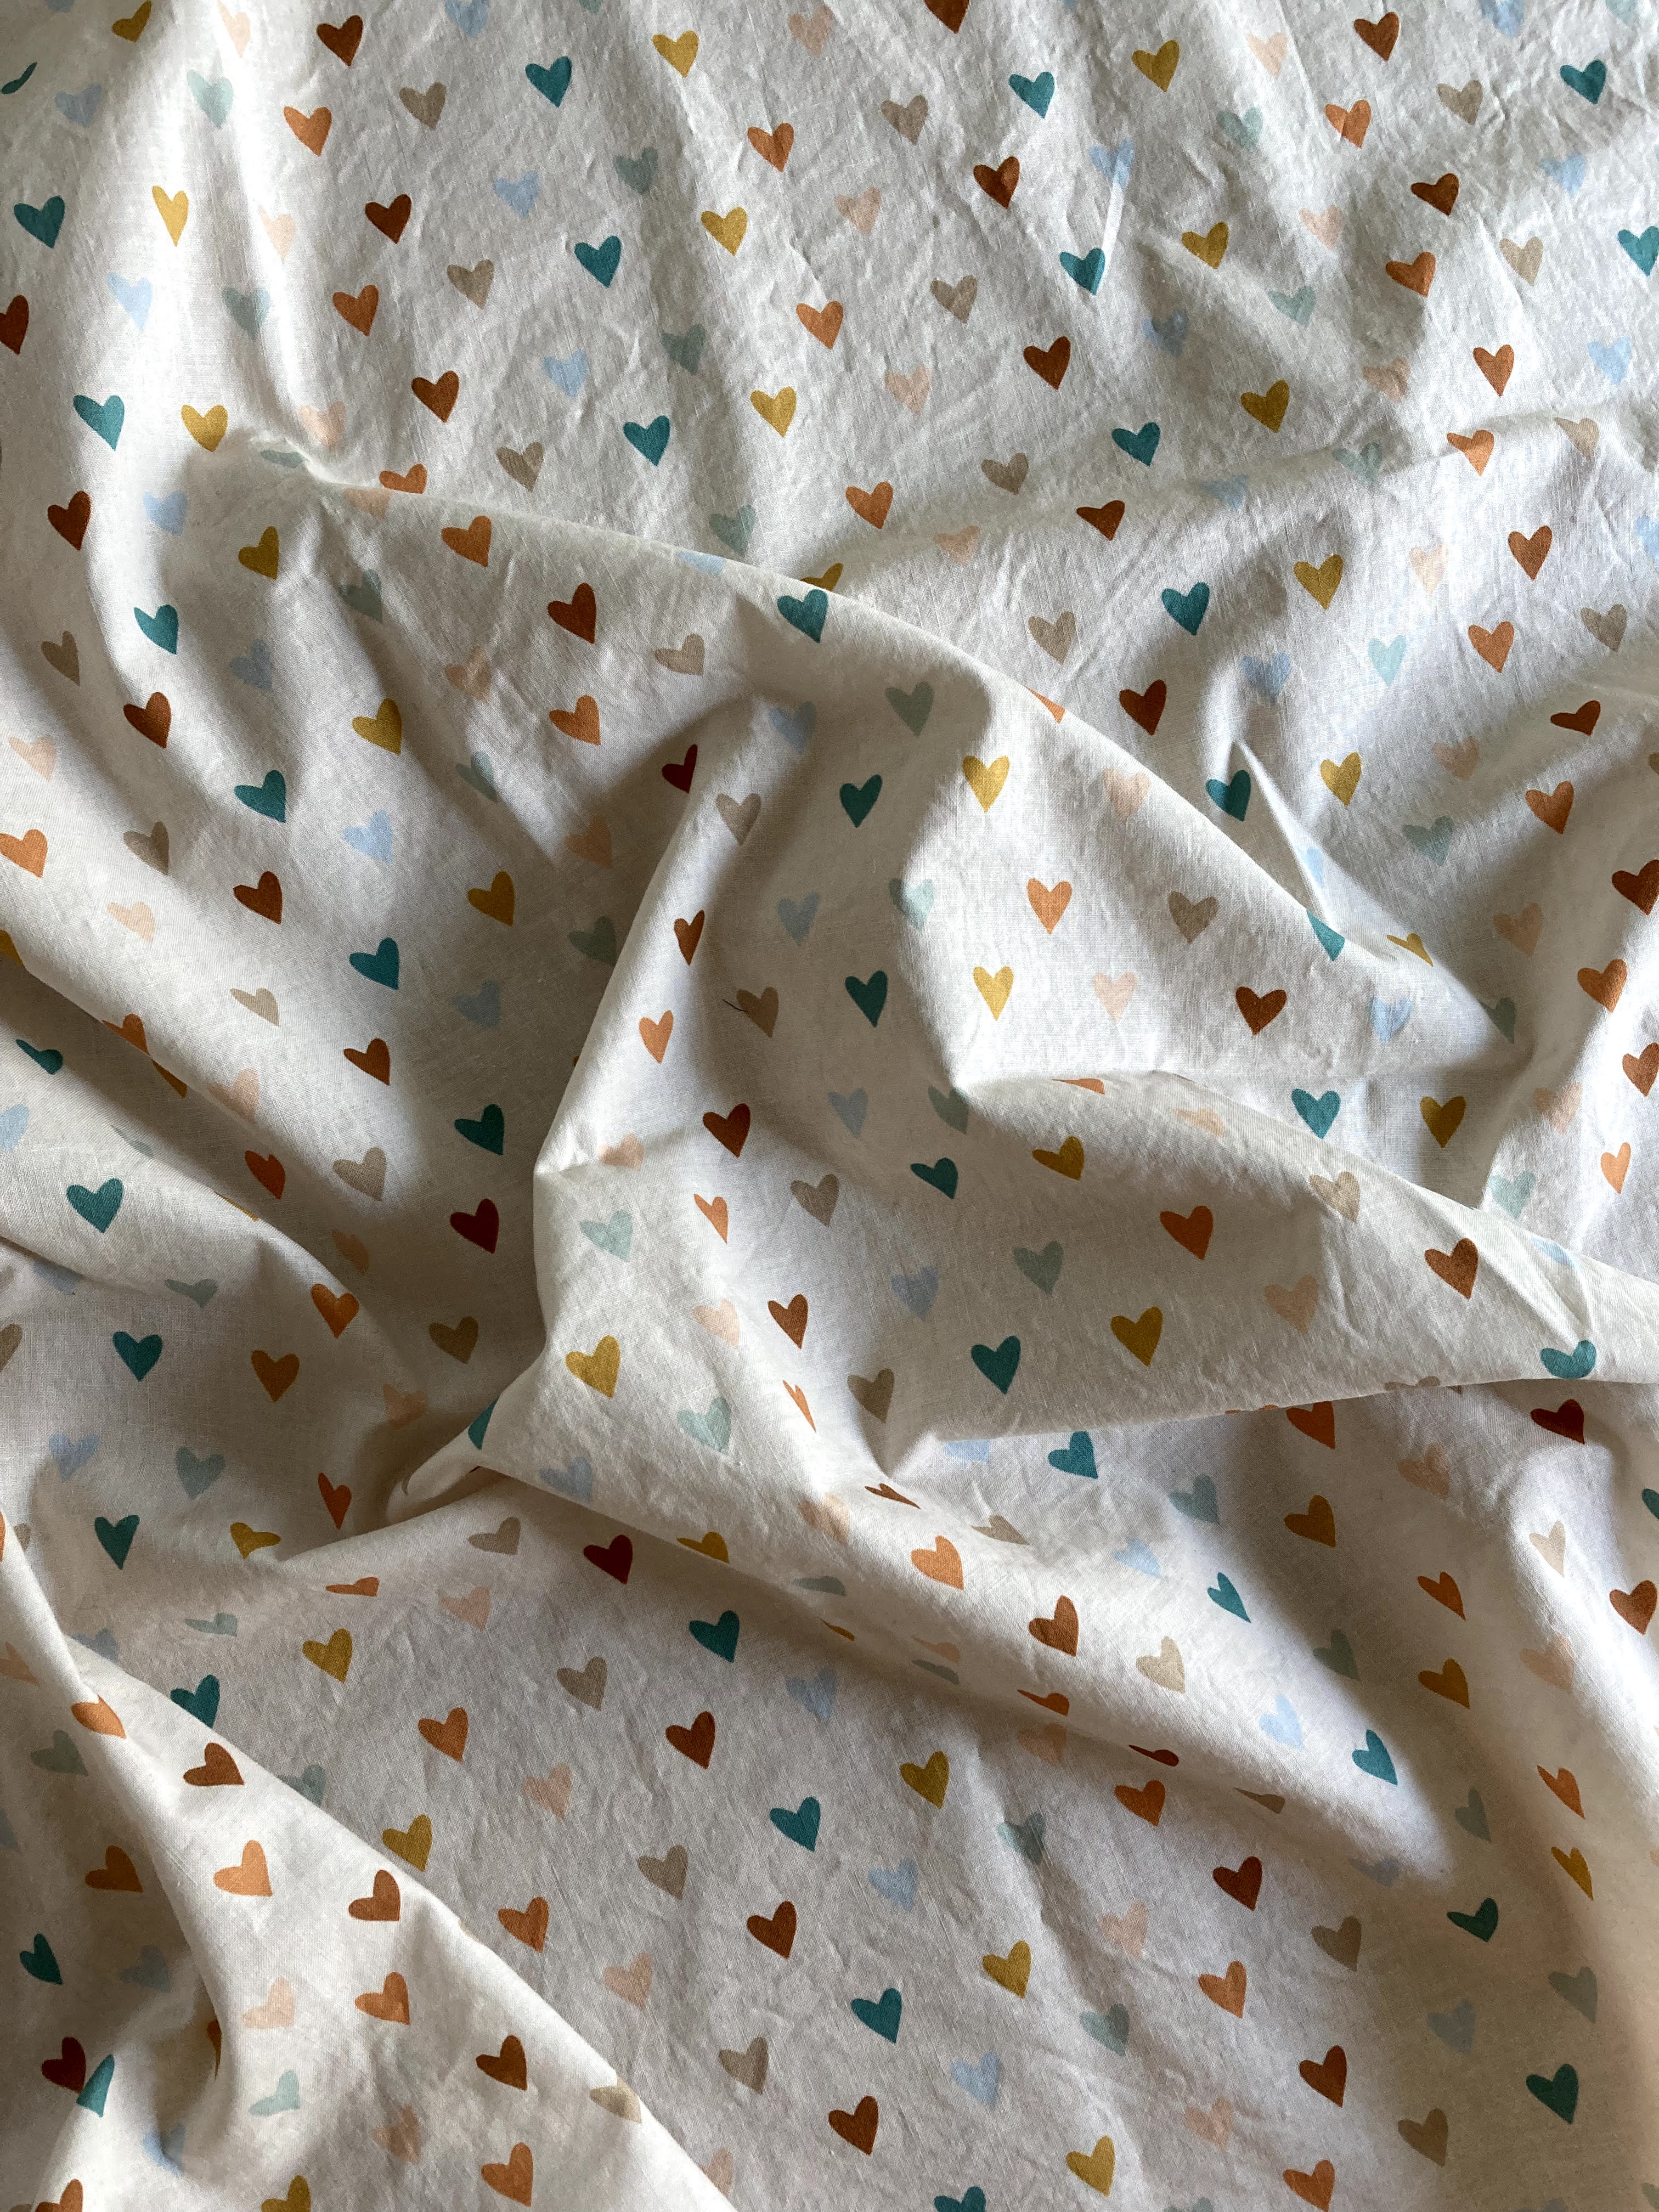
I love heart print anything, so when I saw this I knew I had to have it. For what, exactly, I didn’t even know at the time! After purchasing I thought to use it for a dress, but the more I looked at it, I just couldn’t see it being made into one. I had only a few yards, but it was more than enough for a shorts set, so I used this to make version A & C.

Oh my goodness, this print is beautiful! I fell in love with it the moment I saw it. Gloomy, rainy days spent at home are the best EVER. I could totally see myself wearing pajamas in this print, sitting on the couch all cozy-like with a cup of coffee and a good cult or serial killer documentary playing on Netflix…or I mean, a sappy romantic comedy. Or whatever…..Anywhoo, I contemplated making a full long sleeve/pants combo with this one, but I don’t like being too covered up or too hot when I sleep, so I paired top A with D bottoms.

If you keep up with my blog so far, you know that I love me a good floral print! I used the yellow background already for my b5605 dress, so I went with the olive green background this time. It’s just as pretty, and would give this PJ pattern the perfect retro vibe! Again. I made the short sleeve top with long bottoms (“Neville Longbottoms”…hehe)
Sewing Details
As far as sewing deets go, I was pleased with the directions. For the most part they were easy to follow. I was a little less than pleased to see there were so many pattern pieces to cut out! I think it was 20 pieces total! Cutting out and prepping patterns is my least favorite part of sewing. Ugh. But that’s the life of a seamstress!
I pretty much followed most of the directions on the guide, but deviated a little bit as far as following the steps in order and on certain constructing details, like sewing the inset sleeves flat and attaching the arm/leg bands before sewing the sleeves/leg openings together. I also put my buttons on little differently because I didn’t like where the directions said to place them on the PJ top. Sewing buttonholes with my buttonhole presser foot is great fun because all I have to do is press and watch. It’s like magic!
Another thing that confused me a little bit and I did not end up liking was the finishing on the collar. It looked a little messy to me. Granted, it is on the inside and isn’t seen while wearing it, but it still doesn’t say much for my sewing skills if one were to judge me on neatness . Just remind me not to wear my pajama top inside out around any of you and it will all be ok.
I absolutely love the piping detail on this pattern so there was no way I was going to skip it. The directions mention how to attach pre-made bias piping if you decide to use it, but I still needed a little bit of help figuring it out since it was my first time working with it. The good news is that the process is actually quite simple and easy to do. The key is to use a zipper foot for sewing the piping onto your fabric. Professor Pincushion always helps me when I get sewing brain farts, so check out her tutorial on YouTube if you need visual aid. With the addition of that detail it took me a bit longer to finish sewing, but it was totally worth it! It really does give the pajamas that little bit of “character” I was hoping for.


Shortening hems is standard practice for my personal measurements. For the top, it was too long so I took off 2 inches in length. For the shorts I left it as is, and for the pants I took off quite a bit of inches to accommodate my height. It turned out to be a bad move for the pants in the end, but I ended up actually liking it the more I wore it. You’ll see what I mean when you see the finished photo. This was my first time sewing pants and it wasn’t too hard. I can challenge myself to make bottoms more, now that I have a feel for it.
Finished Garments
And here they are, finished and looking so cute!

It’s too hard to say which print is my favorite, so don’t ask me to pick! I’m really glad I didn’t bypass the piping detail. It really does add to the prints and brings everything “home.” These pajamas just wouldn’t seem as charming without it, you think? For the floral pjs, I had originally planned on using a light pink piping to color match some of the flowers, but I just couldn’t find the perfect matching shade, and I was too lazy to try and make my own, so I went with an off-white color instead that perfectly matched the lighter flowers. I think it was the right choice in the end.

I could take several photos of my beeeeehind to highlight the piping detail on the backs of the pajama bottoms, but I just didn’t feel like doing so, sorry. My pj top covers the piping here when I’m wearing them, but it’s nice to know it’s there nonetheless!


Here is the B6296 view A & C. I had these ready when SoCal had a weekend heat wave a few weeks ago. They served their purpose wonderfully! I was comfy and cool the rest of the night. The cotton I used was a little stiff at first–I notice this a lot when it comes to digital printed fabric. But a couple runs through the wash made them softer and more “lived in.” Aren’t the hearts darling?
(P.S. I am so tempted to tell you all that I wake up all the time with my hair looking like this, but the Hubs may be reading and will call me out for lying, so I won’t. I admit that I did fix my hair–and wear a bit of eyeliner–for my photoshoot, but that’s it, I swear! Since it’s not Halloween yet, I didn’t want to come out and scare you all with my legit Just Woke Up look…Too scary, trust me!)


Here is view A & D, in the ABM Flower Market fabric. This print is organic cotton, and feels AWESOME. It’s like wearing a bedsheet practically. Remember when I mentioned earlier that I took off several inches of length on the pajama pants and it ended up being a tad too much? Well, My finished bottoms sort of look like capris. I thought I had measured correctly, but obviously I was wrong. I wasn’t upset about it though. I actually quite like it! What do you think? Am I fashion forward, or ready for the flood??


Here is view A & D in my rainy day print. Now this is a funny story. So the top is obviously a little different than the short sleeve version, but it’s actually the same view. When I was cutting out my sleeve pattern, I didn’t alter the original because I wanted to preserve it. I ended up just folding along the short sleeve line and pinning it to my fabric. Well, when I was cutting out the sleeve for this print, I ended up folding the pattern sleeve on the “lengthen/shorten” line instead of the “short sleeve” line. The results ended with a sort of 3/4 sleeve instead of a short sleeve top. Again, I consider it a happy mistake because I ended up rather liking it. Some may look at my ensemble and think I’m wearing a child-size or that my pjs spent too much time in the dryer. But it’s all right, I’ll take it! Now all I need is a perfect rainy, gloomy day and I can rock this baby out!
Overall, I truly loved sewing up these pajamas. It’s a nice break from my usual dressmaking (although I do have some dress projects already lined up and ready to go). Now that the weather is cooler, I have Cozy Comfort on my mind, and pajamas sums that concept up pretty well!
If I were to make any kind of sewing changes for this pattern, I think I would definitely go down one size for both the top and pants. You guys, these pajamas are pretty generous! Here is my spool rating for the Lisette B6296 Pajama pattern:
:: Directions & Construction: 🧵🧵🧵🧵🧵
:: Fit & Style: 🧵🧵🧵🧵🧵
Who is loving Fall so far??
xoxo,


This kinda a Hail Mary ask for help but is there anyway you can share the instructions to this pattern with me. I bought it at Joanns and didn’t realize until I got home that it was missing the instructions. And my closest joanns is not close at all. Just beginning my sewing journey at 15 and I really want to make this pattern but it’s difficult to do as a beginner as is let alone without the instructions.
LikeLiked by 1 person
Hi Amy! Congrats on beginning your sewing journey! It’s funny you asked. I was looking through my stash for this pattern and I just so happen to have an extra set of directions. I don’t know why I have them because I only have one pattern. So weird! But must be fate that you contacted me! Anyway, I’m willing to send you the extra set if you still need them. If you can provide me a physical address of where you want it sent, I’ll go ahead and snail mail it to you! Shoot me a private email.
LikeLike
Adorable!!! I am trying to hunt down this pattern! So cute!
LikeLiked by 1 person
Aww, thanks! Have you tried Etsy or eBay? Sometimes even rummaging through the pattern drawers at Hobby Lobby and Joann’s Crafts could unearth this pattern! Also try the Carolyn pajama pattern by Closet Core. It’s very similar to the B6296. Thanks for visiting! 🙂
LikeLike
Believe it or not, I found it on Amazon! It should be here on Thursday. Fingers crossed. 😁
LikeLiked by 1 person
Simply cute as can be! Love the different pattern types you sewed. You did well, I like all the PJs & those clouds & rain are just simply perfect
LikeLiked by 1 person
LOVE the PJs!!!!! SO CUTE
LikeLiked by 1 person
Thank you! ☺️
LikeLiked by 1 person
So beautiful fabric & so cool print. I like. Good look. So Cute!
LikeLiked by 1 person
As always, thank you for those kind words and for following my sewing journey! Glad you enjoy my posts! 💗
LikeLiked by 1 person
You are Most welcome. I read always your sewing blog & enjoy it. Ian so glad. Good job work yours.🌷✍️
LikeLike